Windows XP Professional boxes running the NTFS file system have the capability to set individual file permissions on both files and folders. File and folder permissions allow you to
specify exactly who will be able to read, write, execute, and even list or access a folder. So, file and folder permissions can be a very powerful tool to protect your data from others' eyes.
If your file system is FAT32, then you will not be able to set permissions. Fortunately, an easy way exists for you to convert your FAT32 file system to NTFS. Do a search in the Windows Help and Support Center for Convert to NTFS and you will be shown directions on how you can go about converting your drive's file system.
Setting the permissions on with a lot of control requires you to disable simple file sharing and security. To do so, follow these steps:
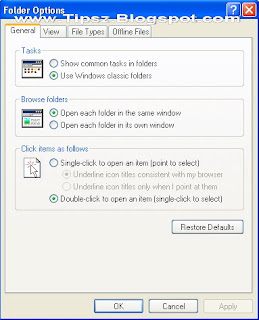
1. Open up any folder on your computer and expand the Tools menu and select Folder Options.
2. Click the View tab and scroll to the bottom of the Advanced Settings box.
3. Uncheck the Use Simple File Sharing option at the bottom of the list.
4. Click OK, and you are finished restoring full control over your file permissions.
Now that you have disabled simple file sharing, you can proceed and easily configure the permissions on any file or folder that you desire. Setting the permissions is very easy once you do it a few times. Follow these directions to set the permissions to maximize your privacy:
1. Right-click any file or folder for which you want to modify permissions and select Properties.
2. Then, click the Security tab. (When simple file sharing was enabled, this tab did not exist.)
3. First, remove all users from the group or username list to whom you do not want to give
access. It is a good idea to remove the Everyone group because this does include everyone that can access your computer. However, make sure that you do not accidentally remove your username from the list. Also watch out for the SYSTEM account. This is one account that the operating system uses to access files. Removing it may cause unexpected results. But, fortunately, if the system actually does need it, you can always add it again if you remove it and it causes problems.
If you are having difficulties removing users from the username list, this could be because the user is inherited from a parent folder. Permissions are passed down to all subfolders and files. If you want a user to have access to a folder but not its subfolders, then you will have to click the Advanced button on the security tab of the Properties window. Once the Advanced Security Settings window loads, uncheck the option that says Inherit from Parent the Permission Entries
that Apply to Child Objects. A Security notification box will pop up. Click the Remove button to remove all of the inherited permissions so that you can have full control of the folder.
4. Now that you have the list of users and groups taken care of, set the specific permissions that the user has on the file or folder. Select the name of the user that you want to modify, then check the corresponding boxes in the Permissions For list for the activities that you want them to be able to do.
5. When you have finished setting the permissions for all of the users, click OK to exit the Permissions screen.
Once you have set the permissions for all of sensitive directories, you will have greatly increased your security and privacy. Also keep in mind that file permissions are inherited. Every folder within a folder inherits the permissions of the parent folder unless they are specifically removed. Therefore, if you set the file permissions for a folder, all of the subfolders and files will be automatically set with the same permissions. File and folder permissions can be very useful. If you have a program on your computer that you do not want anyone else running, simply set the permissions on that folder so that only you can read and execute.
Comments
Post a Comment